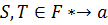
Overview:
Messages sent over the internet take time to get to the sender, typically. D/C<D/S because the messages travel through routing stations and are not entirely photonic. Obviously these messages display where they came from for things such as email( but this is relative, an email from Russia may say from Moscow despite coming from Novosibirsk. However we can use Δt of the sent time stamp and the receive time stamp to create a circle around our location and the sender's location is on the circumference, then by searching for major population centers and or using routing information from the routing servers, the algorithms can determine the senders location very accurately:
PHP Server Side:
1. Let's get the current time for the observer:
Wow a monstrous four lines(sarcasm)
2. Now the time that the sender saw the file leave(by time line I mean the line containing the time):
3.Now let's subtract the times; we need to sift out all letters from the alphanumeric known as $stringcheese, so that we can get just the time:
This works because our timestamp will be 'time $militarytime'. Using military time eliminates the problem of searching the string for AM or PM.
/////////////////////////////////////////////////////
Determining Average Speed of the Signal:
Using a Mac just to mash things up a bit. We need the time it takes for the signal to leave our computer and return from a location.The methodology is the same as in the North Korea Server post but this time I will use a Mac, however the commands are the same:
User$ ping www.facebook.com
PING star.c10r.facebook.com (31.13.71.33): 56 data bytes
64 bytes from 31.13.71.33: icmp_seq=0 ttl=87 time=39.729 ms
64 bytes from 31.13.71.33: icmp_seq=1 ttl=87 time=39.523 ms
64 bytes from 31.13.71.33: icmp_seq=2 ttl=87 time=39.123 ms
64 bytes from 31.13.71.33: icmp_seq=3 ttl=87 time=38.707 ms
64 bytes from 31.13.71.33: icmp_seq=4 ttl=87 time=36.871 ms
64 bytes from 31.13.71.33: icmp_seq=5 ttl=87 time=39.909 ms
64 bytes from 31.13.71.33: icmp_seq=6 ttl=87 time=37.632 ms
64 bytes from 31.13.71.33: icmp_seq=7 ttl=87 time=40.425 ms
64 bytes from 31.13.71.33: icmp_seq=8 ttl=87 time=39.038 ms
64 bytes from 31.13.71.33: icmp_seq=9 ttl=87 time=41.607 ms
Speed:
We can easily find where 31.13.71.33 is with a web search:
The distance there is about:
4748 km and the average time is about 40 s, but the signals travel double the distance so d==9496km and d/x=40 therefore x==237.4km/sec. Thus -237.4*$dt==radius.Note the negative because we used observer time minus received time and for most applications the observer has to send a message before the receiver can receive it. Now for the city search algorithm.
///////////////////////////////////////////////////////////////////////////////////////////////////////////////////////////////////////////////////////////////////
Code Outline:
First we will use a Google maps api to easily display our location graphically and numerically through HTML
It is of the utmost importance that the degree of magnification or the distance from the earth's surface is a constant so, I will rewrite the HTML file to include this necessity at the end. Finally we will display a circle of radius r, save the radius as r.txt, and open an image of our file in java/processing so that the computer can calculate the most probable point of origin. The logical way to do this is to view the world by night and use light pollution as the indicator for the presence of human life. The more life, the more light and vice versa. However the API does not use this map, so we will search for the presence of a specific color, a grey~tan which is associated with the concrete of urban areas:
And the Grey is:
 HTML:
HTML:
Now for the HTML/Javascript code to find us and display us on a map:
<!DOCTYPE
html>
<html>
<head>
<title>Location
Location Location</title>
<meta name="viewport" content="initial-scale=1.0,
user-scalable=no">
<meta charset="utf-8">
<style>
html, body, #map-canvas {
height: 100%;
margin: 0px;
padding: 0px
}
</style>
<script src="https://maps.googleapis.com/maps/api/js?v=3.exp&sensor=true"></script>
<script>
var map;
function initialize()
{
var mapOptions = {
zoom: 10
};
map = new google.maps.Map(document.getElementById('map-canvas'),
mapOptions);
// attempts HTML GEOLOCATE(MUST BE HTML 5)
if(navigator.geolocation)
{
navigator.geolocation.getCurrentPosition(function(position)
{
var pos = new
google.maps.LatLng(position.coords.latitude,
position.coords.longitude);
alert(pos); //this displays
our location
var infowindow = new
google.maps.InfoWindow({
map: map,
position: pos,
content: 'Found You'
});
map.setCenter(pos);
}, function() {
handleNoGeolocation(true);
});
} else {
// Browser doesn't support Geolocation
handleNoGeolocation(false);
}
}
function
handleNoGeolocation(errorFlag) {
if (errorFlag) {
var content = 'Error: The
Geolocation service failed.';
} else {
var content = 'Error: Your
browser doesn\'t support geolocation.';
}
var options = {
map: map,
position: new
google.maps.LatLng(60, 105),
content: content
};
var infowindow = new
google.maps.InfoWindow(options);
map.setCenter(options.position);
}
google.maps.event.addDomListener(window,
'load', initialize);
</script>
</head>
<body>
<div id="map-canvas"></div>
</body>
</html>
Screenshot:
Awesome! Now we need to write a program to capture an image of our area and search for major population centers within the radius, which is defined in the preceding PHP scripts.
In Linux:
$ gnome-screenshot -w -B
This will Screenshot our HTML window. In order to do this we should get rid of the alert() function in the javascript so the HTML tracker reads:
<!DOCTYPE html>
<html>
<head>
<title>Location Location Location</title>
<meta name="viewport" content="initial-scale=1.0, user-scalable=no">
<meta charset="utf-8">
<style>
html, body, #map-canvas {
height: 100%;
margin: 0px;
padding: 0px
}
</style>
<script src="https://maps.googleapis.com/maps/api/js?v=3.exp&sensor=true"></script>
<script>
var map;
function initialize() {
var mapOptions = {
zoom: 10
};
map = new google.maps.Map(document.getElementById('map-canvas'),
mapOptions);
// attempts HTML GEOLOCATE(MUST BE HTML 5)
if(navigator.geolocation) {
navigator.geolocation.getCurrentPosition(function(position) {
var pos = new google.maps.LatLng(position.coords.latitude,
position.coords.longitude);
var infowindow = new google.maps.InfoWindow({
map: map,
position: pos,
content: 'Found You'
});
map.setCenter(pos);
}, function() {
handleNoGeolocation(true);
});
} else {
// Browser doesn't support Geolocation
handleNoGeolocation(false);
}
}
function handleNoGeolocation(errorFlag) {
if (errorFlag) {
var content = 'Error: The Geolocation service failed.';
} else {
var content = 'Error: Your browser doesn\'t support geolocation.';
}
var options = {
map: map,
position: new google.maps.LatLng(60, 105),
content: content
};
var infowindow = new google.maps.InfoWindow(options);
map.setCenter(options.position);
}
google.maps.event.addDomListener(window, 'load', initialize);
</script>
</head>
<body>
<div id="map-canvas"></div>
</body>
</html>
By eliminating the alert(pos); line the command script can now be used to Start firefox and open the HTML file, and then screenshot it.
$ do firefox 'SourcePath of the HTML FILE',sleep(10),gnome-screenshot -w -B
Great! Now you can set up the above line to save it to the location of you're choice.
Groovy. Now time for Processing/Java.
Java/Processing:
N=The number of sides of the polygon and R is the radius of the circumscribed circle which is equal to the radius of the php script, and A=-1.
This is a fair region for the computer to search, but it should be rather quick.
The Processing Side of things will be done with a similar method to that of my post on
my novel Morley Pintururia Naturaleza Muerta Smoothing Algorithm post. In terms of the area to cover, if we were to add in a script which modified the circle to be a regular polygon to try to reduce some of the searching, then:
PImage img;
int a, b,r,u;

void setup() {
  size(1000, 900);
  img = loadImage("cat.jpg");
  a = 1;
  b = 1;
  r=img.width;
  u=0;
  imageMode(CENTER);
  noStroke();
  background(0);

}

void draw() {

  float pixel = map(11, 0, width, a, b);
  int x = int((img.width)-r);
  int y = int(random(img.height));
  color pix = img.get(x, y);
  fill(pix, 128);
  rect(x-1, y, pixel, pixel);
  rect(x+1, y, pixel, pixel);
  rect(x, y-1, pixel, pixel);
  rect(x, y+1, pixel, pixel);
   println(pix);
  if pix=(//this will be our city color){
  println("we have a city here");
}
if(r==500){
  r=img.width;
}
}
The above code will find cities but does not compare them in terms of size, in order to achieve this we write the following:
PImage img;
int a, b,r,u;

void setup() {
  size(1000, 900);
  img = loadImage("cat.jpg");
  a = 1;
  b = 1;
  r=img.width;
  u=0;
  imageMode(CENTER);
  noStroke();
  background(0);

}

void draw() {

  float pixel = map(11, 0, width, a, b);
  int x = int((img.width)-r);
  int y = int(random(img.height));
  color pix = img.get(x, y);
  fill(pix, 128);
  rect(x-1, y, pixel, pixel);
  rect(x+1, y, pixel, pixel);
  rect(x, y-1, pixel, pixel);
  rect(x, y+1, pixel, pixel);
   println(pix);
  if (pix=(//this will be our city color))
  println("1");
else{
println("0");
}
if(r==500){
  r=img.width;
}
}
Now we have an array map of where the sender is!